Thursday, December 23, 2010

Distributing iPhone applications Ad Hoc way for testing

There are thousand of sites describing process of creating provision profile for distributing iPhone app to beta testers but you will still get stuck at some point in process.
If you are using any hybrid frame works like phoneGap/Titanium developer/etc, it gets more complicated.
Here are some basic steps to distribute your iPhone app on friends and colleagues devices.
Prerequisite:
  • Access to iOS provision portal via Apple developer account ($99)
  • Development certificate – Best documentation is available on apple site.
  • App ID – make sure your app id in xcode or titanium developer is same as prov. portal app id.
  • Device ID’s already defined in “Devices” section of prov. Portal
You can get device ID using iTunes or installing app on device.

If you have developer profile already created then you will have all of above items, developer profile is different than Ad Hoc distribution profile, Developer profile will allow you to test device by connecting to mac and deploy your app but wont be helpful if you want to deploy on remote devices.

To do beta testing of your app on other devices you will need Ad Hoc distribution profile.

  • Create Ad Hoc distribution profile:
    Make sure to select Ad hoc as distribution method and select all the devices you want to install app on. 
     

  • Download .mobileprovision file from download option. 

  • Drag and drop profile on xcode icon or xcode-organizer window

     
  • Setup up xcode project:For titanium developer: do not use titanium developer to build project since version 1.2.x does not have option to build app with Ad hoc provision, you can build app using xcode project in build directory.

    • Add Entitlements.plist file to project from File-New File->code Signing->Entitlements
    • Open project -> edit project settings and set 
      • Code signing entitlements to file created in previous step Entitlements.plist. 
      • Code signing entity = iPhone distribution – your name  
      • Any iOS device = iPhone distribution – your nameIf iPhone distribution – your name is not active , restart the xcode.
  
  •  Build xcode project: Clean and build it.
  • Distribute:
    For titanium developer: on successful build, app will be in under build/ Debug-iphoneos/ folder.
    Distribute app and Ad hoc provision profile (will be in folder /Users/xxxxx/Library/MobileDevice/Provisioning Profiles) to testers via email or thru web site.

     
    Finally to install on device just  drag-drop above files in iTunes and sync with device.
        If you get “Signer not valid”, please check if correct provision file is included. 


Sunday, January 25, 2009

read-and-write-to-ntfs-from-mac

Frustrated with earlier attempt to write to my external hard disk using Macfuse, I decided to give one more try

Here are OS and tool versions:
Mac Os: 10.5.6 on Intel
NTFS-3G 1.5130 (stable release)
MacFuse 2.0.3.2

1) Start with installing MacFuse from above link
2) Install NTFS driver from link above

Mac installer will request restart, after restart you will notice following error pop-up

"NTFS-3G could not mount /dev/disk1s1 at /Volumes/MyBook because the following problem occurred:
$LogFile indicate unclear shutdown ... "
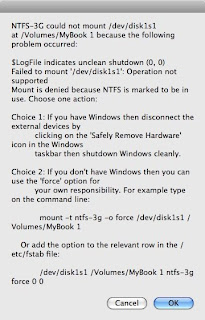

As mentioned in pop-up you will need to mount the drive using "force" switch but before you need to create dir in following location

start the terminal application from spotlight
> cd Volumes
> sudo mkdir MyBook
>sudo /usr/local/bin/ntfs-3g -o force /dev/disk1s1 "/Volumes/Mybook"

Restart your Mac and you should see your disk available in Finder and also in disk utility

Repeat this with different volume names for other NTFS drive.

My 2 drives on My book are now available on Mac with writable capabilities


Wednesday, April 23, 2008

Installing-Different-version-of-tomcat-instance-on-same-machine

Every organization have at least couple of old tomcat or java instance running but those version cannot be used for some new technology stuff like web services and you will find in situation to utilize same physical or virtual server to deploy your next state of art application which uses new version of tomcat and java.

Not sure about most of you but I found myself in above situation and decided to try out installing different version of java and tomcat on same machine.

I don't want to use java installer since it will modify my setting on windows server and I may end up fixing old app to work with new JRE.

Here is my existing configuration on windows box
Apache Tomcat/4.1.12-LE-jdk14
java 1.4.1_02-b06

and I want following to co-exists
Apache Tomcat/5.5.23
java 1.6.0_06-b02

Steps 1 & 2 are no brainer

  1. Copy java JRE folder(jre1.6.0_06) from different machine to target machine in x:\Program Files\Java
  2. Copy tomcat directory from machine where you may have already installed to target machine x:\Program Files\Apache Software Foundation\Tomcat 5.5
  3. Open server.xml from config folder and increment all port number by one

Tomcat 5.5 do not have catalina.bat or any other batch file where you can configure java path, latest releases of tomcat uses apache common demon called Procrun to start as service.

Execute following steps on the tomcat5.exe and tomact5W.exe in Bin folder

  1. Execute tomcat5.exe //IS// on command prompt - this will install windows service with name tomcat5.
  2. Execute tomcat5w.exe - this will launch configuration screen for tomcat5 service. Since we copied the tomcat application, most of the entries will be empty.


Fill in the following:

  1. Description: "Apache Tomcat 5.5.20 Server - http://tomcat.apache.org/"
  2. Log on if you want to start service with different credentials
  3. Log Path: "X:\Program Files\Apache Software Foundation\Tomcat 5.5\logs"
  4. Both redirect box to "Auto"
  5. For java JVM setting: Select new copied JVM
    "x:\Program Files\Java\jre1.6.0_06\bin\client\jvm.dll".
    Update Java-class path to
    "X:\Program Files\Apache Software Foundation\Tomcat 5.5\bin\bootstrap.jar"


For Java option Add

-Dcatalina.home=X:\Program Files\Apache Software Foundation\Tomcat 5.5
-Dcatalina.base=X:\Program Files\Apache Software Foundation\Tomcat 5.5

-Djava.endorsed.dirs=X:\Program Files\Apache Software Foundation\Tomcat 5.5\common\endorsed
-Djava.io.tmpdir=X:\Program Files\Apache Software Foundation\Tomcat 5.5\temp
-Djava.util.logging.manager=org.apache.juli.ClassLoaderLogManager
-Djava.util.logging.config.file=X:\Program Files\Apache Software Foundation\Tomcat 5.5\conf\logging.properties
-Xdebug-Xrunjdwp:transport=dt_socket,address=8000 ,server=y,suspen

Update memory pools as desired

For startup and shutdown, update class to "org.apache.catalina.startup.Bootstrap" and working Path to "x:\Program Files\Apache Software Foundation\Tomcat 5.5".

Select "JVM" in Mode option for startup and shutdown.

Update Argument with "start" and "stop" for tab startup and shutdown respectively.

Note:

If you are using Vista , make sure you start command line in Administrator mode

  1. At his moment you are all set , when you start the service , you may get JVM initialize error.

FATAL ERROR in native method: JDWP No transports initialized, jvmtiError=AGENT_ERROR_TRANSPORT_INIT(197)

This error is cause by debug port conflict (due to other JVM running), which can be corrected by changing "address=8000" to "address=8001" in java option box.

Note: Procrun demon can be used to run any java application as windows services with no effort, Visit apache common demon called Procrun for more details.